
Terminals
The Terminals panel lists the running terminals. It is the first tab in the left sidebar.
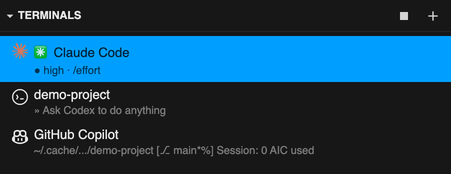
Terminal rows
Section titled “Terminal rows”Each row shows:
- The terminal title.
- The icon of the agent or editor that runs in the terminal. xtralab finds it from the processes of the terminal, also for agents that you start yourself.
- The latest line of output of the agent.
Terminal tabs in the main area show the same icon.
| Button | Location | Action |
|---|---|---|
| + (New Terminal) | Panel toolbar | Opens a menu: start an installed agent, or open a terminal. |
| ■ (Shut Down All Terminals) | Panel toolbar | Stops all terminals, after you confirm. |
| × (Shut down) | Row | Stops that terminal. |
Settings
Section titled “Settings”Settings → Settings Editor → xtralab Terminals panel
| Setting | Default | Description |
|---|---|---|
Show agent activity under each terminal (showAgentActivity) |
true |
Shows the latest line of output under each agent row. |
Move sections between panels
Section titled “Move sections between panels”These sidebar sections are movable:
| Section | Panel |
|---|---|
| Terminals | Terminals |
| File tree | File browser. The toolbar above the tree moves with it. |
| Kernels | Running Terminals and Kernels (hidden by default, see Sidebar tabs) |
-
Right-click the section header. For the file tree, right-click its toolbar.
-
Select Move to panel, for example Move to Terminals.
In the new panel, you can drag the section header to change the order, and select it to collapse the section. To move the section back, right-click it and select the original panel. JupyterLab restores the arrangement when you reload the page.
Custom Panel
Section titled “Custom Panel”Each move menu has Move to Custom Panel. The Custom Panel is an empty sidebar panel for the sections that you move into it. Its tab shows only when it contains a section.
The file browser tab also hides when its tree is in another panel. It shows again when the tree comes back.
Notifications
Section titled “Notifications”xtralab shows a notification when a program in a terminal sends one of these signals:
| Signal | Description |
|---|---|
| OSC 9 | The iTerm2 notification sequence |
| OSC 777 | The Ghostty and rxvt notification sequence |
| Bell | The terminal bell. Controlled by the Notify on the terminal bell setting. |
Coding agents send these signals when they finish a task or need input. They choose the signal from the terminal that they detect, so xtralab sets these environment variables in its terminals:
| Variable | Value |
|---|---|
TERM_PROGRAM |
iTerm.app |
TERM_PROGRAM_VERSION |
3.5.0 |
With these values, most agents send OSC 9 by default.
The notification does not show when you look at that terminal. Select a notification to open its terminal.
The desktop app shows native notifications. If notifications do not show in the desktop app on macOS, see Troubleshooting.
In a browser, xtralab uses web notifications. They need permission from the browser:
-
The first time that a terminal sends a notification, xtralab shows a message with an Allow notifications button. Select the button.
If you closed the message, it stays in the notification center in the status bar.
-
Select Allow when the browser asks for permission.
Web notifications need a secure context: localhost or HTTPS.
Settings
Section titled “Settings”Settings → Settings Editor → xtralab terminal notifications
| Setting | Default | Description |
|---|---|---|
Enable terminal notifications (enabled) |
true |
Shows notifications from terminal programs. |
Notify on the terminal bell (notifyOnBell) |
true |
Also shows a notification for a plain bell. |